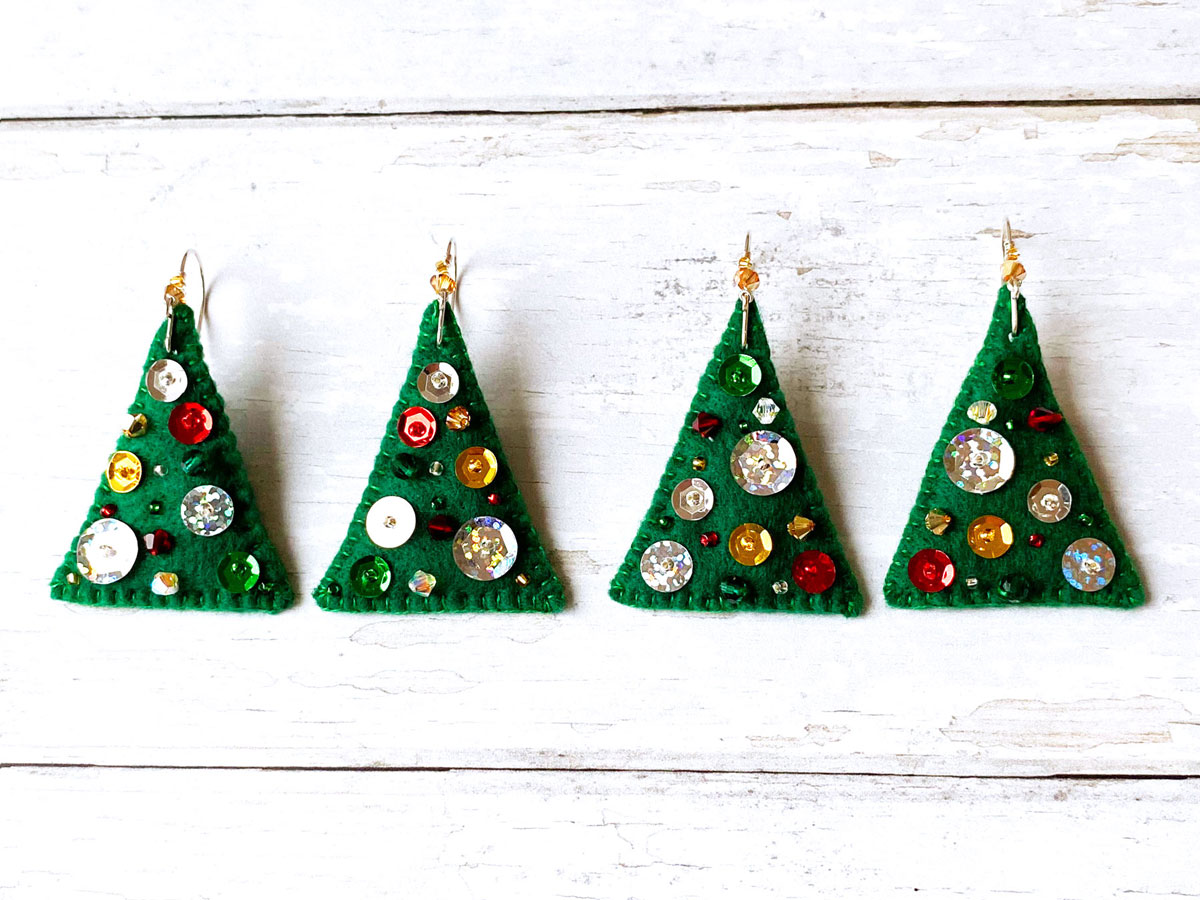
With Christmas parties, winter markets and family get togethers filling the calendar, it’s officially time to bring out the festive earrings hurray! If you fancy something handmade for yourself or to gift, why not make your own felt Christmas tree earrings this year?
This post contains affiliate links. I may earn a small commission at no extra cost to you, so thank you for supporting my blog and helping me keep these free tutorials coming!
These earrings are lightweight, customisable and super easy to sew even if you’re a beginner. Felt is a dream material because it doesn’t fray, and the blanket stitch gives that cosy, handmade finish we all love.

Note* You will need to make your own ear wires or you can purchase your own. If you’d like to make the exact ear wires in this tutorial see the link here; fancy ear wires.
This is what you will need:

Materials
- Green felt fabric sheet
- Sequins round 6mm,8mm,10mm
- Preciosa beads 4mm round/bicone
- Seed beads 2mm
- Green embroidery floss/thread
- Sewing threads
- Ear wires x 2 (or make your own)
Tools
Step 1: Make Your Christmas Tree Template
Firstly, make a pattern template of a Christmas tree 4cm wide and 5cm tall, using a pencil, ruler and paper. Pin this on to the felt fabric with the head pins and cut the felt trees out.

Step 2. Decorate the Front Tree with Sequins and Beads
Have your selection of sequins and beads ready to go and start sewing them on to the front of a felt Christmas tree, using the same coloured thread.
When sewing on a sequin, thread on a 2mm seed bead in front of the sequin, then thread back down the sequin hole into the felt fabric nearby. Tie it off at the back of the felt tree. This is preferred, so that the seed bead covers the sequin hole in a decorative way, whilst holding them both in place.


Once you have finished embellishing the felt Christmas tree, the back will look something like the below picture. You can see each sequin and bead has been tied off individually. Cut off any excess thread that might stick out on the sides.

Step 3: Blanket Stitch the Two Tree Shapes Together
Place the second tree over the back of the first tree, covering the threads and keep them lined up together.
Start a blanket stitch between the two layers near the top of the tree and on the straight edge. For the blanket stitch, one green thread has been used from the embroidery floss, but you can use more if you want a bolder stitch.
Tip: if you’ve never done a blanket stitch before, this wikiHow guide is brilliant.

Work your way around the tree until you get back to the starting point and finish the blanket stitch there.


Step 4. Make a Hole for the Ear Wire
When you have finished the blanket stitch, make a hole in each Christmas tree for the ear wires/jump rings at the top of the tree.
You can use a metal punch for this or use sewing needles by increasing by the thickness, until the hole is big enough.
It’s really important to not break your blanket stitch at this point, so pick an area away from the stitch, but as high up as possible.


Step 5. Attach the Ear Wires
Have your ear wires ready to put through the holes. If you’d like to make the exact ear wires shown in this tutorial, see the steps here; fancy ear wires.
I prefer using sterling silver for the ear wires as it is a high quality metal, hypoallergenic and has antimicrobial properties.


This is the end result with the ear wires only and you can stop at this point if you want to.

Step 6. Add Beaded Wire Wrapping (Optional)
As an optional extra step you can wire wrap a couple of beads onto the ear wires. This gives additional decoration to the earrings and helps keep the Christmas tree securely in place.
I have used 0.4mm sterling silver round wire, 4mm bicone beads and 2mm seed beads for the wire wrapping (Same beads as the earrings). Start wrapping a few times from the top, add the beads and finish the wrapping with a few wraps at the loop, to secure it in place.

And that’s your felt Christmas tree earrings all complete, you will now have an eye-catching pair of handmade earrings to wear for the festive season or to gift to someone special!
For some extra ideas, you could make these earrings in another colour such as blue with silver for a frosty look, or change the colour of the stitching to gold instead of green perhaps?
Love this idea? Save it to Pinterest so you can find it again later!

I hope you have enjoyed crafting your Christmas tree earrings and reading this tutorial.
Feel free to share this post and let me know what you think in the comments, I would love to hear about your creations
Happy Christmas earring making! 🎁
Want more free jewellery tutorials? Subscribe to Craft with Mei below to be the first to see my latest projects.

Leave a Reply