Easter is a delightful time of year where we celebrate the rebirth of Christ and welcome in the spring season for the northern hemisphere. In earlier times, the church associated eggs with new life and so eggs were forbidden to be eaten during Holy Week, which lead to them being decorated.
From the egg comes the chick hatchling and all other things known to be associated with Easter crafts today are therefore connected with early spring.

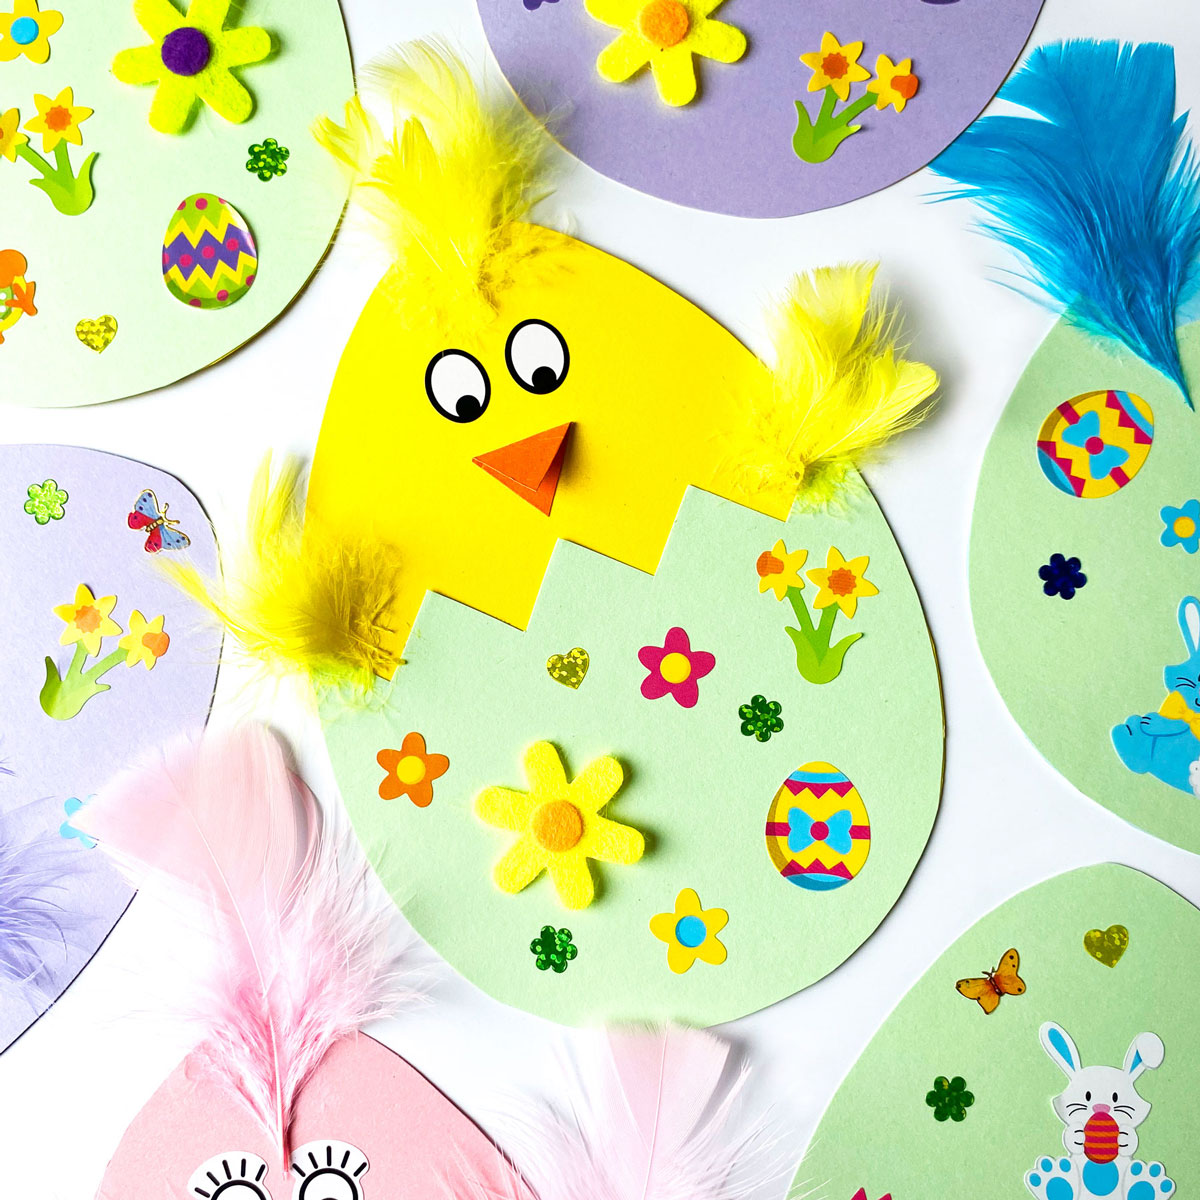
To celebrate Easter in our local toddler group we were tasked to organise a craft, for toddlers and preschoolers to get stuck into. We decided to make these easy egg shaped chicks. The children and adults throughly enjoyed making these, so we wanted to share this with you too!
For this craft you can make an Easter chick or decorate an Easter egg, or both, with the same template depending on your child’s age and abilities.

You will also have Easter themed stickers to use, so there will be plenty of opportunity to learn about the Easter associations of spring time.
*Please note that adult help and supervision will be required for this craft at all times and special care should be taken when using the scissors and glue. If there are any allergies to feathers ensure to use artificial ones.*
So let’s get started, this is what you will need:

- A4 coloured card (pastels, bright yellow and bright orange)
- Easter themed stickers
- Eye stickers
- Coloured feathers
- Pritt stick glue
- Safety scissors
- Pencil
- Easter chick template (optional)
You can download our free Easter Chick Template (link below), or create your own of an Easter egg, eggshell and chick beak.
An adult will use the template to draw around and cut out the card pieces ready for crafting.

Help your child glue on the egg shell with pritt stick glue. Fold the beak piece in half and glue this on too. If your child is older they will be able to do most of this themselves.

Have your child stick on the eyes and Easter stickers to the egg shell. This is a great opportunity to talk about what items you are sticking onto the chick.

Place glue on the sides above the egg shell and on the top of the chicks head. Pop on some feathers until you are happy with how it looks. You can guide your child to do this themselves or help them if needed.

You will now have a lovely finished Easter chick!

As an option you can just decorate the egg with stickers and feathers. This would be more suitable for toddlers and is a much quicker craft for shorter attention spans.

For alternative media you could try experimenting with crayons, pens or paint to decorate the chick and egg. Do let us know your results by adding to the comments at the end of this post.

Wishing you a joyful Easter!
Feel free to share this post and let me know what you think in the comments, I would love to hear about your results.
Happy Easter Chick making! 🙂
If you enjoyed this post and want to be notified of the latest Craft with Mei tutorials, enter your email below to subscribe.


Leave a Reply