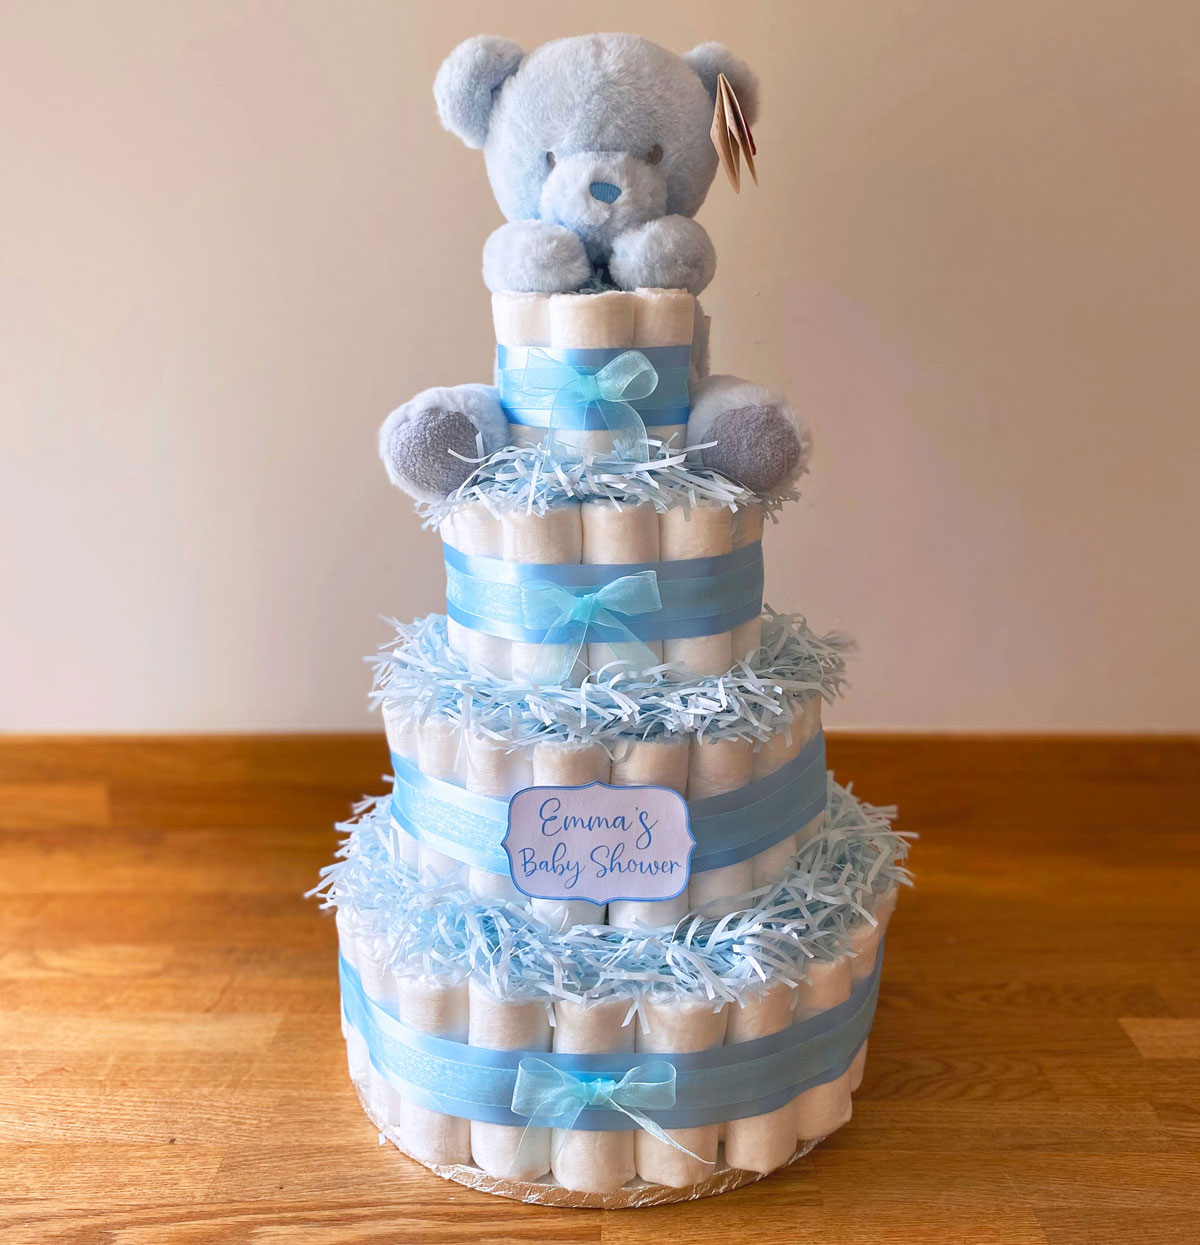
Are you wanting to know how to make a nappy cake that’s as beautiful as it is practical for a special mum-to-be? In this 10 easy step guide, I’ll show you exactly how to create a stunning four-tier nappy cake with a topper, the ultimate handmade gift and a show stopping centrepiece for a baby shower.
Not only will it wow the recipient, but it’s also wonderfully useful for new parents who’ll appreciate having a ready stash of nappies in those early weeks. Best of all, you can customise it to match any theme, keep costs low by making it yourself, and add that personal touch that makes it truly memorable.
This post contains affiliate links, which means I may earn a small commission at no extra cost to you. By using them, you’ll be helping to support my blog and keep the tutorials coming. Thank you!
What’s great about this style of nappy cake is that as long as you get white nappies for the outside, it doesn’t matter what colour nappies you have for the inside, white or not.

You can also make your nappy cake with any size nappies of your choice. I have personally chosen size 2 & 3 and got mine from my local Tesco supermarket in the UK. I wouldn’t suggest size 1 because mum-to-be would probably already have these and babies do grow out of size 1 too quickly.
The total nappies used for this cake is 108.
For the middle of the nappy cake I have used a 36cm tube which has come from the inside of a cling film roll (cling film sized 35cm on the packaging). You will need a tube at least this tall to be able to make a four tier cake and we can top up any difference in height, which will be shown later.
So let’s get started, here is what you will need:


Nappy Cake Materials and Tools
- Nappies (size is your choice)
- 12″ Cake board
- 36cm Tube (e.g. from a 35cm cling film roll)
- Shredded tissue paper
- Satin ribbon 4cm width
- Organza ribbon 2cm width
- 3.8cm Rubber bands (x 130)
- 20cm Rubber bands (x 6)
- Scissors
- Double sided sticky tape
For the nappy cake topper (optional)…
- 16cm Teddy bear
- Paper straws
- 3mm Ribbon (or string)
Step 1. Roll the Nappies
Start by rolling up your nappies one by one. The easiest way is to begin at the top edge and roll downwards, keeping each roll as tight and neat as possible. Once rolled, secure the middle with a 3.8cm elastic band to hold it in place.
Taking a little extra time here pays off as neatly rolled nappies will give your finished cake a clean, professional look that makes all the difference.

Step 2. Build the First Tier
Start forming the base of your cake by placing rolled nappies around the bottom of the tube, securing them with a 3.8cm elastic band. Don’t worry about using coloured or patterned nappies in the centre as they will be hidden. Save the plain white ones for the outside layer to give your cake a clean, professional finish.
Once the first circle is complete, add a second and third layer of nappies around the outside, securing them all together with a large 20cm elastic band. This will create a sturdy, full-looking bottom tier.


For the final outer layer, use only white nappies and make sure the ends are all facing inwards. This simple trick gives the tier a neat, uniform finish that looks really professional once complete.

Step 3. Secure the Cake to the Board
Prepare your cake board by sticking down four pieces of double-sided sticky tape in the positions shown below. Carefully place the first tier (with the tube still in the centre) onto the board, making sure it’s positioned neatly in the middle. Gently press down so the tape grips, this will keep your nappy cake securely tethered to the base as you build upwards.


Step 4. Build the Second Tier
Now it’s time to create the second tier. Just as you did for the first tier, place rolled nappies around the central tube and secure them with elastic bands. This time, you’ll only need three layers of nappies instead of four.
Keeping the layers tight and even will help your second tier sit neatly on top of the base and start giving your cake its tiered shape.

Step 5. Build the Third and Forth Tiers
For the third tier, repeat the same process but use only two layers of nappies around the tube.
For the fourth (top) tier, make a single layer using only white nappies and secure them neatly with a 3.8cm elastic band. If the tube leaves a gap at the top, don’t worry just roll up a piece of cardboard from your recycling box and slot it into the centre.


Step 6. Add the Shredded Tissue Paper
Now it’s time to add some colour and texture between your tiers. Remove tiers two, three, and four, then place a generous amount of shredded tissue paper on top of each layer, concentrating around the outer edges. This will create a pretty “ruffled” effect that peeks out between the tiers once they’re stacked again.
When the tiers are back in place, use scissors to trim and neaten the tissue to your liking. And don’t worry if you find yourself tweaking it as you go, as I was still fussing with the tissue right up until my nappy cake was finished!

Step 7. Add the Satin Ribbon
Now for the finishing touch that really pulls the cake together, ribbon! Wrap a length of 4cm width satin ribbon around each tier, neatly covering the elastic bands. Secure the ends at the back with double-sided sticky tape so they stay in place but remain invisible from the front.

Step 8. Add the Organza Ribbon & Bows
Next, layer a length of 2cm width organza ribbon over the centre of each satin ribbon. Wrap it neatly around the tier and secure the ends at the back with double-sided sticky tape.
Using the same organza style ribbon, make four small bows and attach one to the front of each tier. You can also add extra bows at the back to hide where the ribbons join.
This extra layer of ribbon softens the look and the bows add a delicate, pretty finish that makes your nappy cake feel truly special.

Step 9. Add the Topper
The topper is where you can really get creative! Popular choices include a teddy bear, personalised sign, nursery mobile, toy, balloon, or even a small lampshade, anything that ties in with the baby’s theme.
For this nappy cake, I used a 16cm teddy bear. If your topper doesn’t fully cover the top tier, simply add a little shredded tissue paper in the centre to hide the recycled card.
If you’re also using a teddy, here’s a handy tip: create a little “seat” using four paper straws. Tuck the straws securely behind the ribbon on the fourth tier, then place the teddy bear on top. This keeps it sitting upright and looking adorable.


Step 10. Secure the Topper
Finally, it’s time to make sure your topper stays firmly in place. Wrap a piece of 4mm ribbon (or string) around the teddy bear and tie it securely within the nappies of the fourth tier. Position the ribbon so it’s hidden from the front, leaving your teddy sitting snugly on top without any visible ties.
And that’s it, your beautiful nappy cake is complete and ready to be gifted to the special mum-to-be!

💡 Tip: For a gorgeous finishing touch, you can wrap your nappy cake with cellophane. Use a clear piece of cellophane (200cm x 80cm) and tie it neatly at the top with a rubber band and your 4cm satin ribbon. Trim away any excess with scissors. I did this just before transporting my nappy cake to the baby shower, and it made the whole thing look extra fabulous!
You can also get creative with different colour schemes; pink, yellow, white, or even themed designs and swap out toppers to suit the occasion. For this cake, I replaced one ribbon with a printed sign on card to personalise it for the mum-to-be, and it was such a lovely touch. Maybe you can try something similar too.
Thank you so much for following along with this tutorial. If you give this project a try, I’d love to hear how yours turns out. Feel free to share in the comments below.
Love this tutorial? Save it to Pinterest so you can find it again later!

If you enjoy making thoughtful handmade gifts, you might also like my Seasonal and Celebratory crafts for more creative ideas.
Happy nappy cake crafting!
Enjoyed this tutorial? Pop your email below to get the latest Craft with Mei posts straight to your inbox. 💌

Leave a Reply