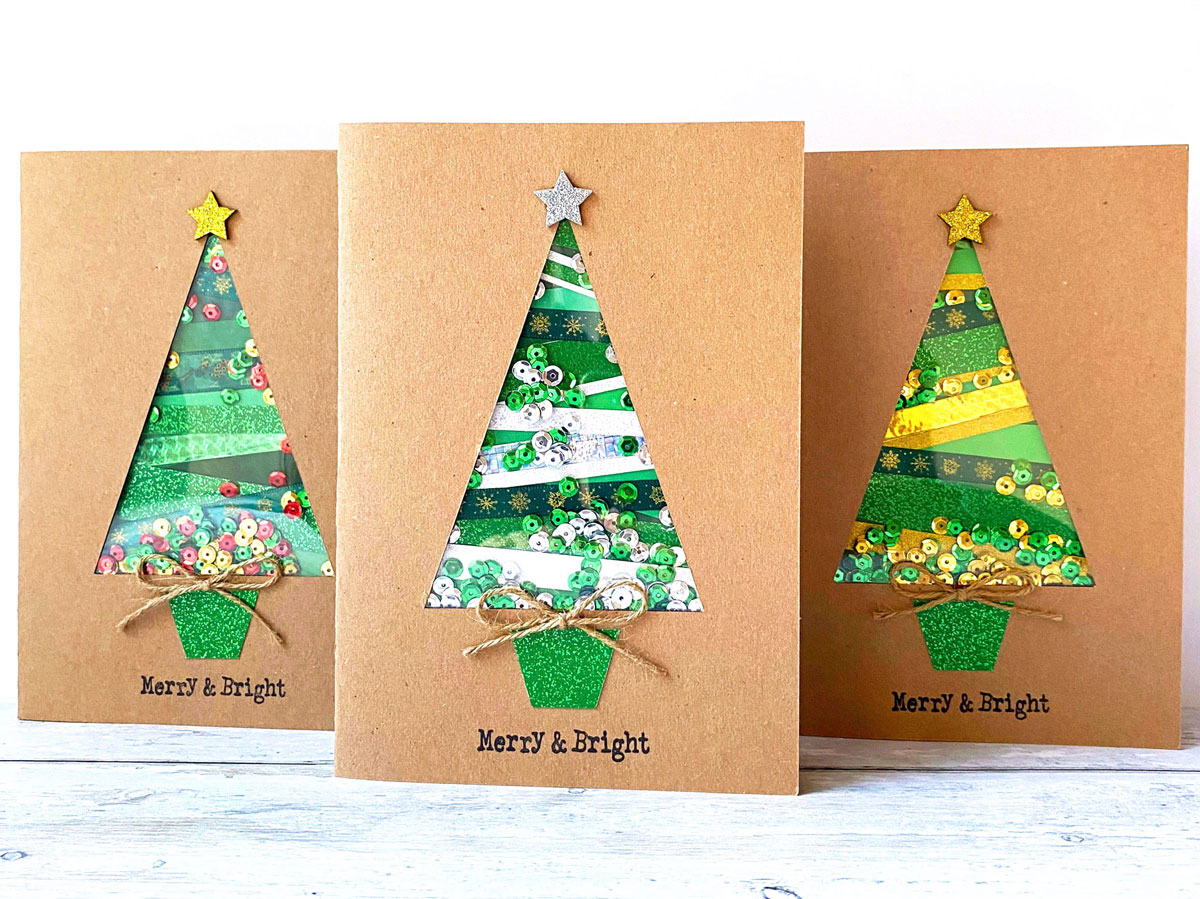
Hurray! It’s that festive time of year again when we send merry wishes to our loved ones in the form of Christmas cards. But this year, why not add a little extra sparkle by making your own Christmas tree shaker cards? They’re fun, interactive, and guaranteed to put a smile on your friends’ and family’s faces.
Unlike traditional cards, shaker cards have a magical twist! Give them a gentle shake and watch the sequins dance inside, creating a brand-new festive scene each time. ✨
This post contains affiliate links, which means I may earn a small commission at no extra cost to you. By using them, you’ll be helping to support my blog and keep the tutorials coming. Thank you!
If you love shaker cards, you might also enjoy my Christmas Bauble and Snowglobe Shaker Card Tutorial. It’s another festive favourite alternative to this design!
Best of all, your loved ones will treasure the fact that you made their card by hand. You can even personalise each one to match their Christmas décor or favourite colours, a thoughtful touch that makes your handmade card truly special.

For this particular tutorial, you’ll be using strips of paper, card, ribbon, and tape to create a collage-style Christmas tree. The layered textures add depth and also help the sequins settle in different places for an even more magical effect.
It’s a perfect project for using up your scrap ends of paper, card, or ribbon. A thrifty touch that makes each card unique.
So let’s get started! Here’s what you will need for this DIY Christmas shaker card:

Craft Materials
- A4 natural kraft card 280gsm
- Green card and paper in various shades
- Gold or silver glitter card
- Holographic tape
- Christmas ribbon
- Natural kraft or brown paper
- Acetate sheet 240 Micron
- Round sequins 6mm in green, red, gold, silver
- Stars in gold, silver
- Christmas stamps and ink
- Jute twine
Craft Tools
Step 1. Cut Out Your Christmas Tree Shape
The first step is to draw the Christmas tree shape on the inside of the card. Avoid marking about 1cm around the edges of the card as this will not be covered later. Find the middle and make a line, mark your tree 2.5cm from the top and 5.5cm from the bottom. Make your tree 13cm high and 9cm wide.

Next, using a craft knife, cutting mat, and safety ruler, carefully cut along the outline. Take your time and go over the lines a few times rather than trying to cut through in one go.

Step 2. Stamp Your Christmas Greeting
At the front of the card, lightly mark under the tree in the middle and 0.5cm down. Then mark a further 2.5cm down. This is where the tree pot will go later. Then stamp a Christmas message using these marks to align your stamp. You can see on top of my stamp I have made marks to help with this alignment.

Step 3. Create and Attach the Acetate Window
Next, with the acetate sheet use scissors to cut out a Christmas tree of 15cm high and 11cm wide. I have made a template (in blue) to draw around with a ballpoint pen, as I found this to be the easiest way to keep the acetate tree free of marks in unwanted places.

Next, open the card and place 10mm double-sided sticky tape around the cut-out tree shape on the inside. Carefully position the acetate tree over the opening and press it down firmly so it sticks in place. This acetate layer will form the clear window that holds the shaker sequins.

Step 4. Make the Base of the Christmas Tree
Now it’s time to create the base of your main Christmas tree. Using green card, cut out a tree shape measuring 15.5cm tall and 12cm wide. To keep it neat, mark out the shape lightly in pencil on just one side of the card, then cut along the lines with scissors. Don’t worry if you can still see the pencil marks as this side will be covered later.

Step 5. Decorate the Tree with Strips and Ribbon
Make your strips of card, paper and ribbon of different widths between 0.3cm and 2cm. It’s best to cut the strips of paper and card using a craft knife or trimmer to get the edges straight.

Stick these strips onto the green tree (pencil free side) to your liking. Use pritt stick glue for the paper and card. I found it best to stick on the tape first, secondly paper, then card afterwards as it’s ideal to have the thicker materials on top. Finish off your tree by adding on the ribbon with double sided sticky tape.

Once you have finished your Christmas tree collage, flip your tree over and cut off the excess with scissors.
Step 6. Assemble Your Shaker Card
Now it’s time to bring everything together!
Stick the 2mm sticky pads around the edge of the acetate tree on the inside of the card. Ensure the gaps are smaller than the sequins so they don’t escape! Take the backs off the sticky pads, load your sequins onto the acetate and stick on your Christmas tree with the front faced down.

Check the front of the card to make sure you are happy with how it looks, as this will be the best time to make any amendments. You can remove and replace a few pads, to add in or take away sequins at this point.
Step 7. Add the Backing Paper and Message
The next step is to add the backing paper onto the inside of the card, using double sided sticky tape a few mm away from the edges. Cut the end points off the Christmas tree to make more room for the backing paper.

The backing paper needs to be 0.5cm less than the card width and length. This makes the size of the backing paper to be 20.5cm x 14.5cm. Carefully stick your brown backing paper onto the sticky tape and press it down into place.
For an extra festive touch, you can stamp a Christmas greeting on the inside of the card at this stage.

Step 8. Finish the Front of Your Card
To complete the front of your card, create a simple tree pot shape from green card. It should measure 3.5cm across the top, 2cm across the bottom, and 2.5cm high. Stick the pot in place beneath your tree using Pritt Stick glue.
Next, tie a small bow with jute twine and attach it with PVA glue applied using a brush. Finally, glue a star to the top of your tree with PVA glue for the perfect festive finishing touch.

Once everything is dry, give your card a shake and watch the sequins dance! Your handmade Christmas shaker card has come to life! ✨ I hope you’re delighted with your results and enjoyed the process of making it.

Why not experiment with a few variations? Try a blue or pink tree, swap round sequins for star shapes, or even use Christmas wrapping paper as your backing. I’ll definitely be trying some of these ideas myself!
Matching Envelope for Your Christmas Shaker Card

Complete your handmade Christmas card with this matching kraft envelope. This envelope is slightly larger than the shaker card, giving it a comfortable fit and a beautiful finished look.
Love this tutorial? Save it to Pinterest so you can find it again later!

I’d love to see what you create, so please share this post, leave a comment with your results, or get in touch via my contact form if you have any questions.
If you’re looking for more festive craft inspiration, don’t forget to visit my Christmas Bauble and Snowglobe Shaker Card post for another version of this craft.
🎄 Happy Christmas shaker card making! 🎄
If you enjoyed this tutorial and would like to be the first to see my latest Craft with Mei projects, pop your email below to subscribe.


Leave a Reply