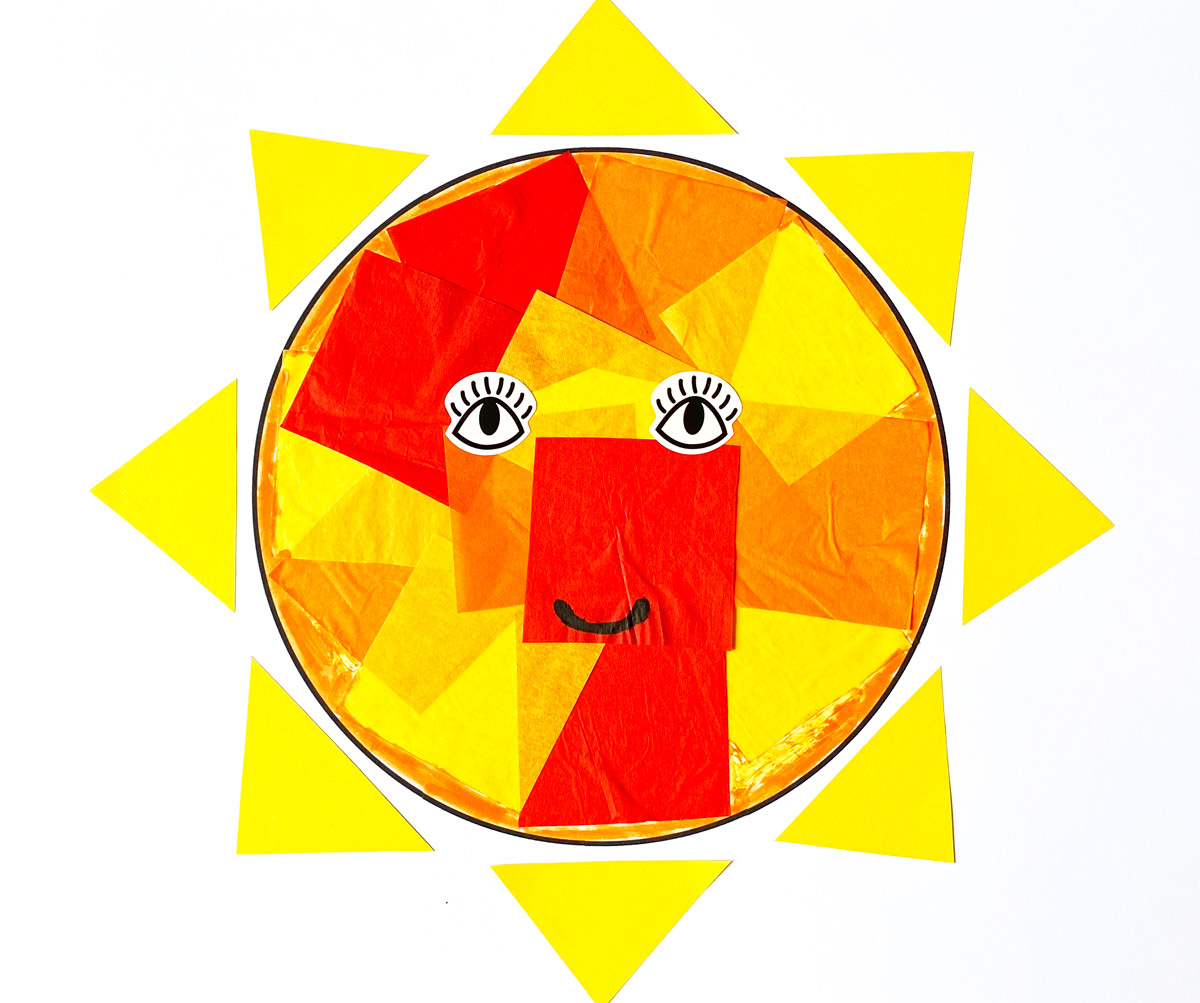
This summer, why not make a summer sun picture with your toddler, preschooler or child to welcome in the warm sunshine! Ideal for the summer season or to celebrate the summer solstice this picture craft is easy to organise, fun to make and creates lovely sunny results.
Your child may use this opportunity to colour and stick within the circle for this sun craft or they will most likely colour and stick outside of the circle, creating the sun’s solar flares.
You can use A4 white card for the background or A4 white paper. We used A4 card for this example and when we took this to our local toddler group, we used A4 paper with great results.
This is also a good craft for using up your ends of tissue paper, as you can cut them into small squares and children like to stick with these. Just ensure to use warm sunny colours such as yellow, orange, red and a dash of pink if you like.
*Please note that adult help and supervision will be required for this craft at all times, during the making and however the craft is used afterwards.*
So let’s get started, this is what you will need…

- A4 white paper or card
- A4 Yellow paper
- Tissue paper squares (sun colours)
- Washable felt tip pens (sun colours)
- Eye stickers
- Ruler
- Pencil
- Safety scissors
- Pritt stick glue
- Black washable pen (for the mouth only)
Firstly you will need to print out a circle onto A4 white paper or card. You can use this free template below or if you prefer, you can make your own.
For the sun rays, on yellow A4 paper make 3cm vertical lines with a pencil and ruler and cut the strips out. Then cut by eye, the strips into triangles and aim for them to be the same size as possible. Make 8 triangle pieces for each sun you intend to make and spares.

Your child can start with colouring in the sun or using tissue paper first, each will produce fabulous results there’s no right or wrong order here. We have chosen to use tissue paper first in this example.
With the tissue paper squares help your child stick these within the circle or they may be able to do it all themselves. Do not worry if the paper is stuck outside the circle as this will only add to the picture and will be the sun’s solar flares.

Help your child stick on the yellow triangle sun rays with pritt stick glue, this will be the trickiest part so they will need the most help here to make it look like a sun.

Next have your child do some colouring inside or outside of the circle with yellow, orange, red or pink pen. They will most likely colour outside of the circle but these will be the sun’s solar flares.
Have your child add on some sticker eyes and use a black washable pen for a mouth. Try to keep the black pen for the mouth only and only bring it out when doing this final step. Otherwise, the finished picture may get covered enthusiastically in black pen scribbles.

Here are some examples below for when we took this craft to our local toddler group. The first is from my two year old, you can see he has stuck on the tissue paper squares well and made a lovely solar flare.
The second is from my three year old and he also stuck on the tissue paper well, added some lovely solar flares and eyes that look like they are floating above. I did help them both with the triangle sun rays to make it look like a sun.


And this will be your summer sun craft picture complete. I hope you like your results and get to display it proudly somewhere to welcome in the sunshine this summer.

Alternative ideas for this sun craft would be to use coloured paper for the background instead of white. You could use a rectangle shape for the sun rays instead of triangular. You could also use coloured cellophane squares instead of tissue paper perhaps. If you have any further ideas do share them with everyone in the comments below.
Feel free to share this post and let me know what you think in the comments, I would love to hear about your results.
Happy sun craft making!
If you enjoyed this craft and want to be notified of the latest Craft with Mei posts, enter your email below to subscribe.

Leave a Reply