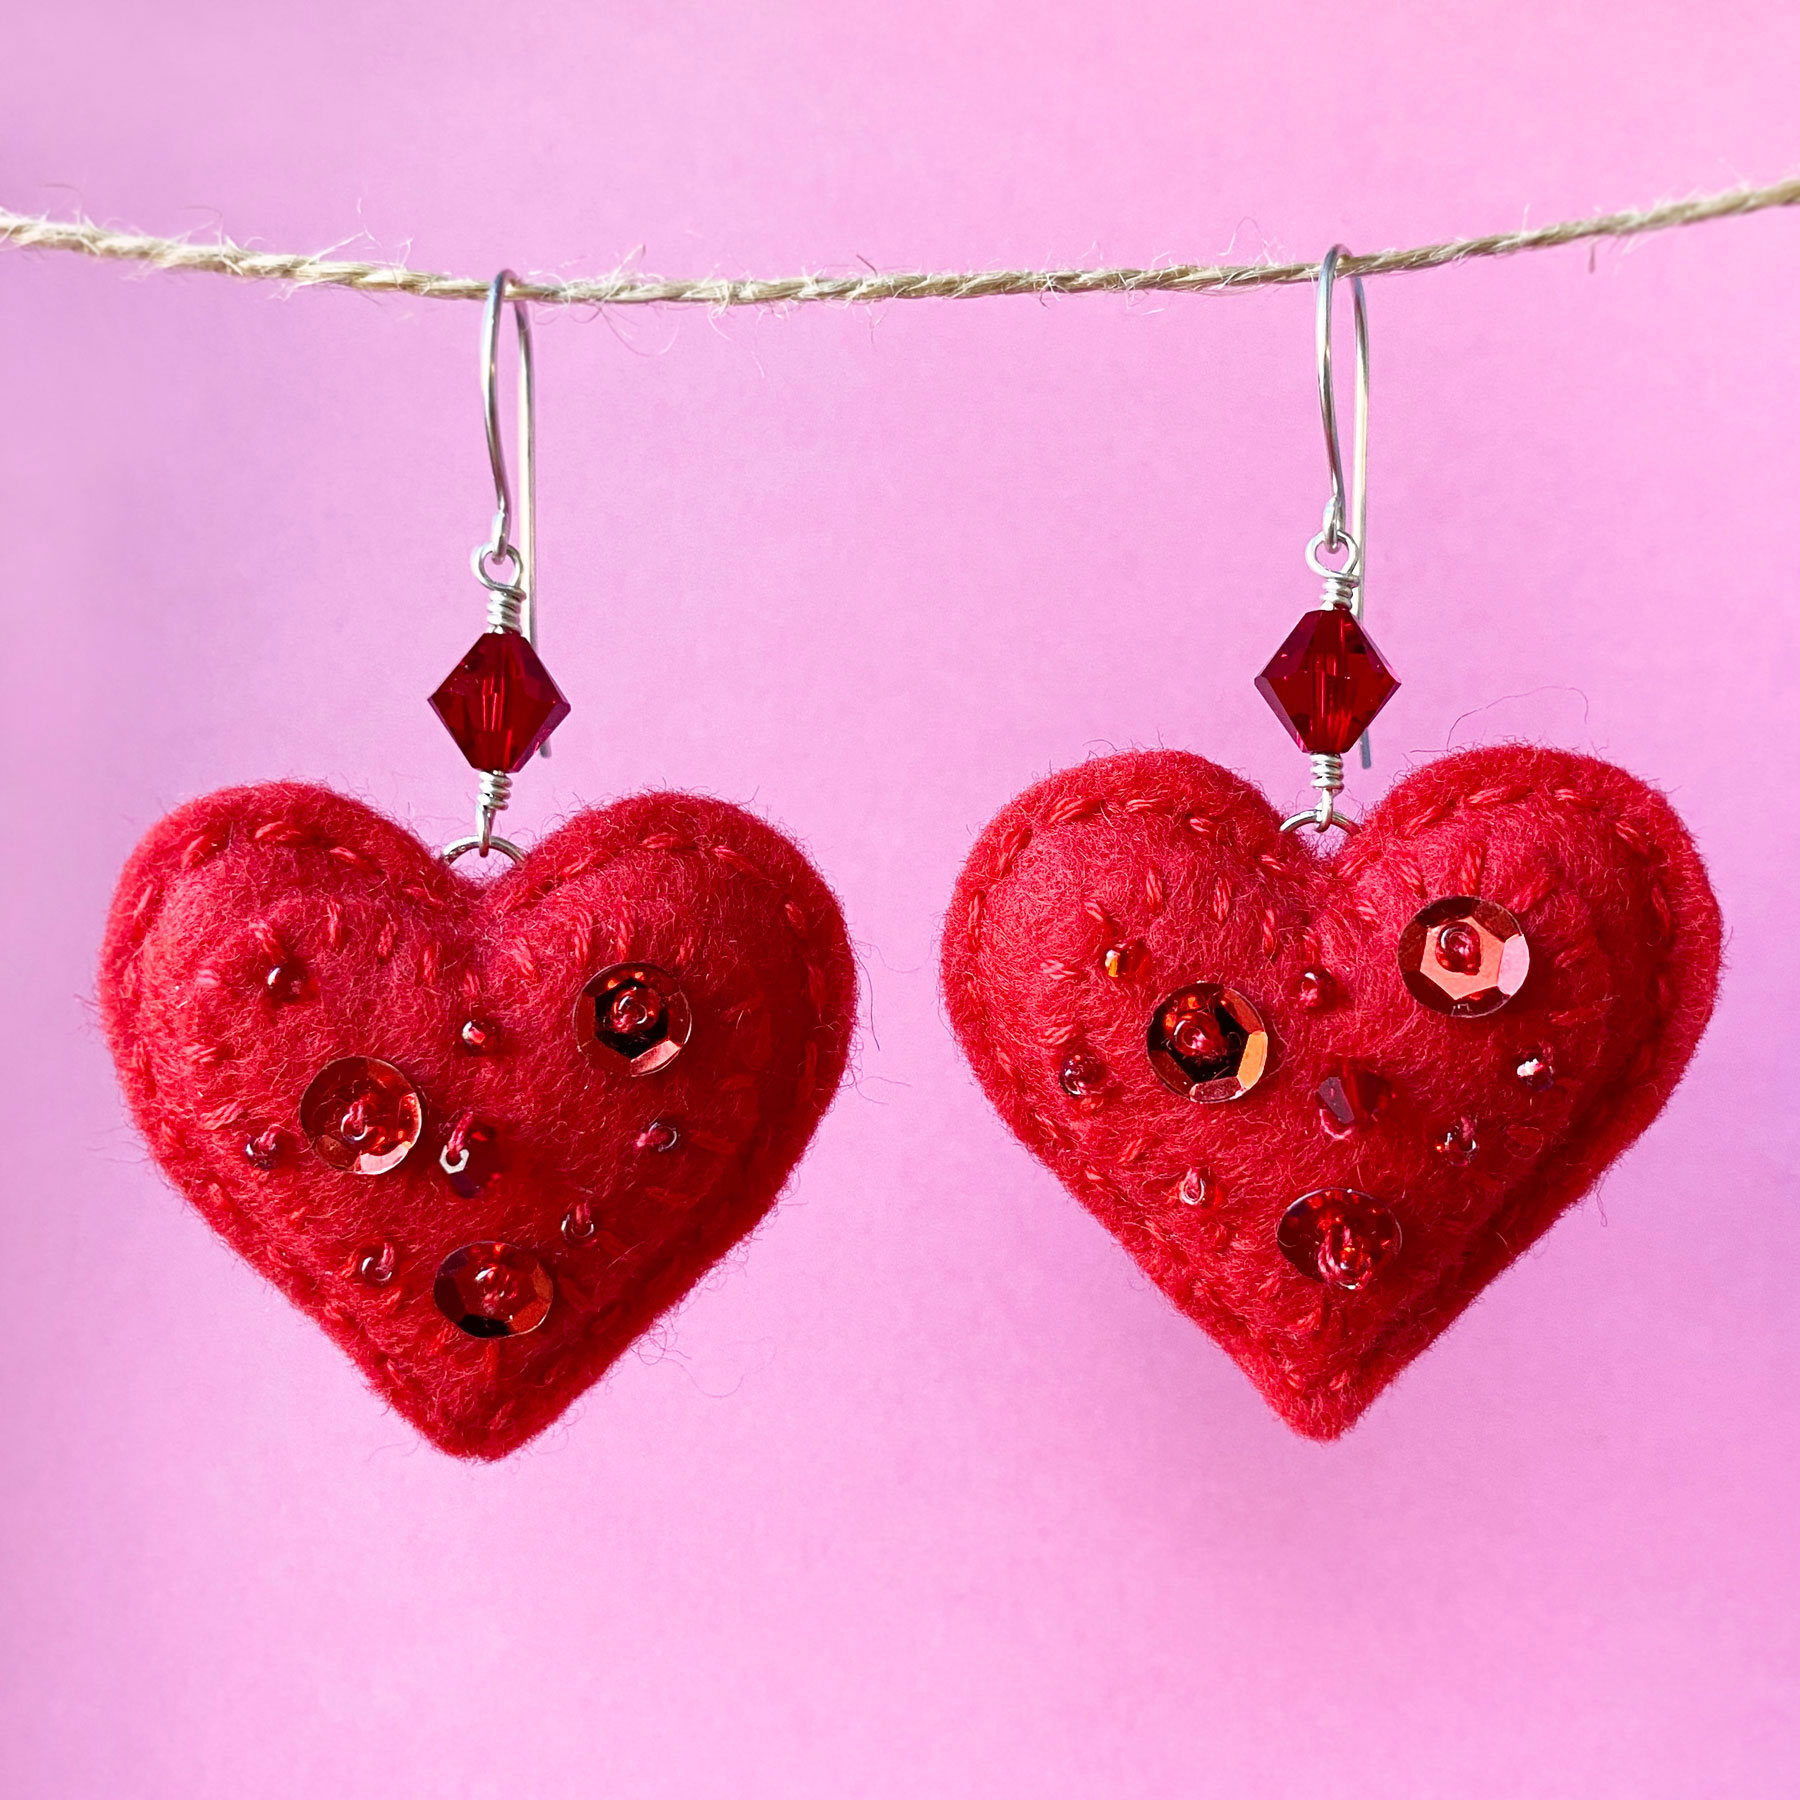
With Valentine’s Day just around the corner, love is in the air and so are all things heart-shaped! Whether you’re celebrating with a spouse, significant other, family or friends, this is the perfect time to spread a little heartfelt joy. What better way to get into the mood this February 14th, than by crafting up a pair of handmade heart earrings?
Not only are they perfect for Valentine’s Day, but this design can be customised to wear all year-round. Imagine a pastel green pair in spring or a sky-blue pair in summer. Plus, felt is super easy to work with (no fraying!) and makes for a comfortably lightweight pair of earrings.

These earrings have been made using sterling silver wire, as I find this precious metal to be the best quality. It’s strong, durable, and even has natural antimicrobial properties. However, you’re free to use any metal wire you prefer.
For the hand-sewing portion of this tutorial, you’ll be using a whip stitch and a running stitch, along with sewing sequins and beads onto felt.
On the jewellery-making side, you’ll learn how to create a wire bead link (optional) and ear wires (optional too!). Or, you can purchase pre-made ear wires if you prefer.
If you’d like to make your own ear wires, check out my Plain Hook Ear Wires Tutorial for step-by-step instructions. For guidance on making a wire bead link visit the Wire Bead Link Tutorial for full details.
So let’s dive in! This is what you will need:
Materials for felt heart
- Red felt fabric sheet
- Sequins 6mm
- Seed beads 2mm
- Red embroidery floss/thread
- Red sewing thread
- Stuffing (cotton, wool or synthetic)
Tools for felt heart
- Hand sewing needles
- Sewing head pins
- Fabric scissors
- Stitch unpicker
For the jewellery components
- Ear wires x 2 (Plain Hook Ear Wires Tutorial)
- Jump rings 6mm x 2
- Wire bead links x 2 (Wire Bead Link Tutorial)
To get started, you’ll need a heart template. I’ve created one for you to download below, but you’re also welcome to design your own. Once you have your template, use it to cut out four larger hearts and two smaller hearts from your felt.
While the templates are designed to be symmetrical, I recommend folding them in half before cutting to ensure perfectly even shapes. A little extra precision goes a long way in making your earrings look polished and professional!

The same principle applies when cutting the felt hearts to ensure symmetry. I recommend securing the template to the felt with a sewing pin, then folding the felt in half. Once folded, carefully cut around the template to achieve a perfectly symmetrical shape.

To remove any creases, gently iron over the felt using a cotton fabric in between and on a low setting. Otherwise the felt will melt!
Next, using a double thread for added strength, sew the beads and sequins onto the two smaller hearts. Be sure to tie each bead and sequin individually as this ensures proper tension and helps to prevent unraveling.

From the back view you can see they are tied-off individually. This will be hidden inside the heart once finished.

Next place the smaller heart on top of a large heart and with two strands of embroidery floss, start a whip stitch all the way around the smaller heart. Start the stitch on the reverse side, as this will be hidden and try to keep the stitching at the front vertical to the edge as you go around.

Once both smaller hearts are securely sewn in place, this is what they should look like. Don’t worry about the hearts being perfect as this just adds to the charm of handmade felt earrings.

For the remaining two large hearts, sew a jump ring to the top centre. Keep in mind that the stitching will be visible at the back when complete.

Now place the two large hearts together, with the sequins at the front and the jump ring sandwiched in the middle. Start your running stitch at the bottom and on the inside of the heart. Stop halfway when you reach the jump ring as this is when you will start adding in the stuffing.

Using the rounded end of any small tool (yellow handle of a stitch unpicker as shown in the picture below) carefully push the stuffing into the heart.
Carry on stitching and stuffing until you close up the heart. Finish your stitch by making a knot and then pulling through the remaining thread inside the heart with the needle. Cut any excess as close as possible to the edge of the heart.

This next step is optional. You can either attach the heart directly to an ear wire or use a wire bead link for added detail. To make your own wire bead link please visit the Wire Bead Link Tutorial for full instructions.
Add a wire bead link onto the jump ring, using 0.6mm wire and add a 6mm bicone bead.

To make your own ear wires please visit the Plain Hook Ear Wires Tutorial for step-by-step instructions. Or have your purchased pair of ear wires ready.

Attach your ear wire to the wire bead link and you will have completed your felt heart earrings!
For variations of these felt heart earrings, experiment with different colours. Try mixing and matching the shades of the larger and smaller hearts for contrast. Consider using embroidery thread in a bold colour to make the stitching stand out. You can also personalise your design with different beads and embellishments.

Feel free to share this post and let me know what you think in the comments, I would love to hear about your results.
Happy felt heart earring crafting!
Enjoy this jewellery tutorial? Enter your email below to receive the latest Craft with Mei posts straight to your inbox!

Leave a Reply